Rotating Christmas Tree Wiring Diagram
& Directions

Figure 1
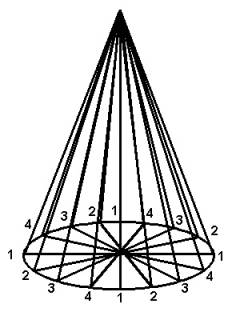
Figure 2
Use
4 (four) strings of lights to wire the tree. Each string may be up to 200
lights, e.g., 35, 50, 100, 135(100+35), 150(100+50), 200 (100+100). Make
sure you coil the extra wire between two connected strings so that the
last bulb of the first string and the first bulb of the second string have
the same spacing as the rest of the bulbs. This will eliminate gaps in the
lighting. First, fold the light string in half and mark the center with a
piece of tape. Next, fold the string in fourths and mark each fourth with
a piece of tape. Refer to Figure 1. Start with the plug end of the light string at the tree
trunk at the base of the tree. Place the one fourth marker at the
top of the tree and attach the lights to the tree branches of paths (1)
and (2).You may go in and out on the individual branches as you go up the
tree. Next, place the half way marker at the base of the tree and attach
the lights to tree branches of paths (3) and (4). Place the third, one
fourth marker, at the top of the tree and attach the lights to tree
branches of paths (5) and (6). Last, place the end of the string at the
base of the tree and attach the lights to tree branches of paths (7) and
(8). Repeat this procedure three more times with the other strings of
lights as shown in Figure 2.
Space
the lights around the tree at an angle of 22.5degrees. Or place the second
string in the middle of the first string. Place the third and fourth
strings between the first and second string. This will divide the circle
into 22.5 degree increments and will look like Figure 2. Plug the lights
into the controller in a 1,2,3,4 sequence and mark the plugs for easy
identification. Select LIM 1 (MODE 1) on the controller. This will
make the tree appear to rotate. This is especially effective with all
lights of one color, but works with any combination of colored lights.
Other
modes can also be used. Try different ones for different effects. Have
fun!!! Slow the speed down so you can see the patterns more easily. You
can't
harm anything so play around.
(Tip:
I find where the ramping modes are (15,16,17, by pressing and holding the AMODE@ button and pressing either
the A+@
or A-@
buttons until the light brightness ramps up and down. Then I press the A+@
button until I see the 2 of 4 LIM, Lights-In-Motion,
pattern. That is MODE 1).
When
you have selected the mode (pattern), speed, and brightness you want, just
let it run for a minute and it will remember the settings automatically.
It operates the same way every time you turn it on even if you have it
connected to a switched outlet!!!